Sunday, June 27, 2010

Epoxy Fillets and Taping Seams.


Dry-fitting one of the deck beams. This will not be installed till after all the seams have been glassed.


I'm getting to the stage where it's tempting to start doing things out of order like starting the interior framing. But first, it's important to get all the seams fully joined by gluing them together with a mixture of thickened epoxy and fiberglass tape. This can be really nasty work, and it's important to take some time to set up a good work space and have everything you will need in place before mixing any epoxy.

The basic plan is to wet out the seams with unthickened epoxy to let it penetrate the wood, then adding the thickened mixture on top to create the fillet. Some people like to do the fillet and glassing all at the same time right on top of the wire stitches. Instead of doing everything at once, I'm laying down a thin fillet first and letting it set up enough that I can remove the wires, clean up the seam a bit more easily, then add the fiberglass tape. Doing it this way also lets the seam get strong enough that I can get in the boat and do the final glassing up close. I hoping this will make for a cleaner seam.


At first, I was just applying the thickened epoxy with a small drywall tape knife and then smoothing it with a rubber squeegee cut to the right shape. But that didn't work too well and eventually I ended up putting the thickened epoxy in a small baggie with a corner cut out and squeezed it into the corners. It's kinda like piping icing onto a cake. That worked and only required a tiny bit of work with the squeegee to get a nice rounded fillet.

I did have some trouble with always getting the same consistency of thickness in the epoxy mixture. Even though it looks plenty thick in the mixing cup, it's important to lift a gob of the stuff out of your mixing cup and make sure it does not run at all. Otherwise you end up with a fillet that sags when you aren't looking.


Damned saggy fillets....


After the fillet has set, the stitches can be removed by applying a bit of heat to the wire long enough for it to soften the epoxy enough to pull the wire out. I have found that nippers are the perfect tool for this, but vice grips work pretty well too. I think I get a better finished seam this way, but it takes a bit longer. I've been waiting for the fillets to set up but not fully cure (18-24 hours or so) to remove the wires. Most of them just pulled out easily with some pressure from the nippers, but a few were a bit more stubborn. For these I pulled out the soldering iron and let them warm up for a minute or so, then they slide out no problem. Of course I hear that there is a much faster way to do this. Where the soldering iron takes 30 second to a minute, the quick way is to get a car battery and some jumper cables. Okay, at this point I'm thinking some gloves and eye protection might be a good idea too. Then, just hook the negative to one end of the wire and touch the positive to the other side and voila, instantly hot wire. Leave it there a bit longer and it might look like this.

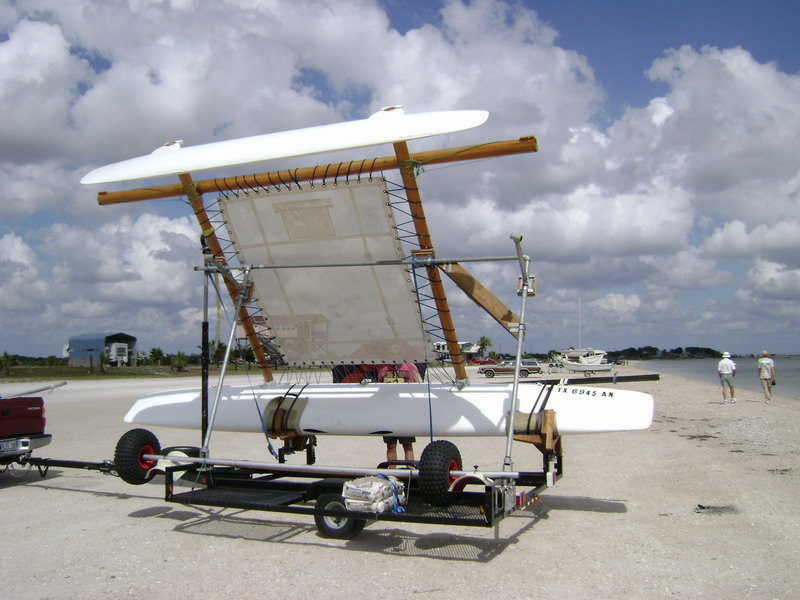
This is Andrew Linn's Laguna Sinko after this year's Texas 200. The boat was built on the beach just hours before launching and was always intended to be sailed for one event and then used for a bonfire. Some Say Andrew is crazy, but not me. Not out loud....

I'm not sure who took the picture, but it's reported from the Duckworks Texas 200 Special Report page.

Once I got all the wires out I added a bit more thickened epoxy to the seam and laid on a couple layers of 10 oz. fiberglass tape. The key here is getting the tape fully saturated before applying it to the seam. I just set up a wide flat board with some freezer paper on it to lay out the glass tape. I then pour some epoxy on top and squeegee it around till all the weave is saturated. Then I add the next layer right on top and wet it out as well. Then I take the pre-soaked tape and gently lay it into to the filleted seam and use the squeegee to slowly work any bubbles of air out the side of the seam. If I need to, I will add a bit more unthickened epoxy to the tape to make sure none of the weave is left dry.

Most of the seams I'm working on right now will be hidden in the closed section of the boat so I'm not getting too concerned about them looking perfect. Hopefully I'll have my technique dialed in by the time I get to the seams that will show in the completed boat. One thing I'm considering is laying down some of the plastic coated freezer paper as a release film on top of the final layer of glass and squeegeeing on top of that to give a smooth finish without having to add an extra layer of fairing mixture.


It's hard to get pictures when your hands are in surgical gloves covered with epoxy. Marie will be taking more pictures as I'm at it tomorrow and I'll add them here soon.

Thursday, June 17, 2010

Inwales

My first attempt at installing the inwales ended with a loud "crack" as the Douglas fir I had chosen gave up the ghost to a hidden knot. Upon further inspection, there were lots of little flaws in the wood that were bound to give me problems. So I went down to my local mega building-supply store and started picking through the lumber stacks. I decided to go with the Southern Yellow Pine that Graham had suggested in the first place (when in doubt, do not question the designer). I managed to find two very nice pieces with no visible knots or warping. I did notice right away that this stuff was much stiffer and heavier than the Douglas fir. I probably could have just forced the inwales into place, but after one round of cracked wood, I decided to play it safe and steam them first to help them ease into place. Plus, ya know, fire, steam, and lots of down time to drink beer? Sounds like my kind of project.


So first thing is to set up some kind of steaming box.


The observant among you may have noticed that my steam box is actually just a piece of PVC pipe. And you may also be asking yourself, "Hey, isn't that stuff gonna melt with all that heat?" Well, sure it is, but not before it does its job, right? Well, not exactly...

The pipe itself is easily up to the job of steaming for and hour or two, but it will get soft during that time. My tactical error was to only support the pipe in the middle, giving it plenty of leverage to bend down on the ends when we pulled out the first inwale. So the second inwale was a bit tough to jam in there, but we got it eventually. When it was all done, the PVC was pretty soft. I guess all it's good for now is cutting up for cheap clamps.


(It happens to every PVC pipe once in a while...)


So after steaming, the inwales bent into place without a peep. Then we clamped everything into place to let it cool and dry overnight.


It's true what all the pro boatbuilders say. You cannot have too many clamps. And those cheap PVC clamps are great for clamping over large areas. I use vice grips, hand clamps and C-clamps at all the critical spots, then use the PVC clamps in between those for even pressure. There are lots of other important tools required on inwale day. Can you spot the most important one?


Here, let me help you.


So the inwales rested overnight and by morning had taken on enough of the bend that it was quite easy to pull them out, lay down thickened epoxy, and set them back in place single-handed. They are setting-up now.

Next up, installing the transom and filleting and taping all the seams.

Thanks once again to Guy for all the help wrestling everything into place, and to Marie and Tracey for all the great pics.

More soon.

Sunday, June 13, 2010

Yves' Sportboat 18

Our next stop on the Houston Boatbuilding Tour was over to Yves' garage to see his Sport Boat 18. This is a kit boat from the Bateau company. There is a whole new generation of high-performance boats designed for easy home builder construction. That is not to say that Yves needs an easy-to-build boat. He had previously built a beautiful little Selway Fischer design that he sailed in the 2009 Texas 200 and made a great job of it. Here is a picture of it stored beside the new project.


These sport boat designs represent a significant step up from what most people think of when picturing home-built boats. The combination of computer-aided design, CNC routing of kits and advances in materials and construction techniques has put truly performance boats well within reach of even moderately skilled home builders. One of the first of this generation of boats was the i550 class epitomized by Tokyo Trash Baby.


Here is a nice account of her construction and some great vids of her in action.

So Yves is well along the way to having the hull assembled and ready to flip.


He is making one very interesting modification to the stock design. The original plan calls for either a bulb keel or a weighted centerboard. But Yves' is building it to have both. I'm quite curious to see how how works this out and once he is a bit further along, I plan to head over there to take a bunch more pictures. Here are a few shots of the progress on the centerboard and keel.


That last shot is of the foam positive for the mold for the keel bulb. Yves plans to have the bulb cast by a professional. When I picture vats of hot, molten lead cooking in the back yard, I think that's a wise choice.

When done, he should have a boat that is capable of racing quite well against other keelboats as well as the ability to camp-cruise along the shallow Texas bays. Sounds like the perfect boat to me. Yves, if you ever need crew, just gimme a call!

Next up in the tour is John Goodman's Goat Island Skiff. I hope to have that up in a day or two. Next on my project is installing inwales and transom and epoxying and glassing the inner seams. Unfortunately, business has kept me pretty busy since 3-D day but I'm hoping to carve out some time soon.

Cheers,
Pete

Wednesday, June 9, 2010

3-D Day!

It’s a strange moment when you get to the “stitch” part of the stitch and glue process. The next step in the process is to drill a bunch of holes in the bottom of the boat… wait, what!?!? Holes in boats are bad, right? Well, there ya go, it has to be done.


So you may ask, “what is the most helpful thing to have on hand when you take a boat 3-D?” Answer: Lots of great friends who are willing to sacrifice their weekends to labor in 100 degree heat for you.


With all this help, the boat goes from being a stack of panels like this,


to something like and actual boat like this in about five minutes.


Then it’s time to start tightening all the wire stitching. The wire is 16 gauge steel wire cut into 3-5 inch lengths. As you might imagine, tightening all those stitches with a regular pair of pliers gets a bit rough on the hands. After several hours of this I decided to invest in a nice pair of vice-grip pliers with padded handles. They make a world of difference.


It’s helpful at this point to have a building cradle to support the hull with enough height that you can fit underneath to tighten the stitches along the centerline.


This is also the time to wire in some of the bulkheads and a temporary center frame to help pull the panels into the correct shape.


The forward bulkhead was a bit stubborn, and after several attempts to pull the hull into the correct shape by tightening stitches, and adding some weight inside the hull to coax some bend into the panels, we decided the leave it alone overnight to see if the plywood would “relax” into the correct shape over time.


When this turned out to not make a difference, I made a call to Graham, the designer (one of the reasons I chose his design was his reputation for always being available to answer questions) and he told me that each variety of plywood has slightly different bending characteristics. That being the case, the best solution was to scribe the existing bulkhead to the actual shape the panels were making rather than try to force them into a shape they were trying to resist. We are not talking about a huge difference here, but my boat will have the sharp bow shape extend several inches further back than the stock plans indicate. I don’t expect this to have a significant impact of the hull’s performance (fingers crossed).

By this time, it was HOT. The more sensible of us decided to find some shade…


But the rest of us kept pressing on tightening stitches and drilling holes into our clothing.


Since the hull shape was now not matching up with the original bulkhead shape, we decided to shave down the building cradle to better match the actual shape.


Some of the stitches were difficult to get at, and it was helpful to have one person press the panels together while the other takes up the slack in the stitches. In tight place like under the hull, this was a job for people who like working closely with others. “Honey, come here, I have a job for you…”


How many guys can say they have a wife who will bleed for their boat project? I’m one lucky dude.


(Thanks to Tracey for taking over camera duties while Marie was under the boat)

So we ended up the day continuing to tighten stitches and watching the hull slowly tighten up. Pretty cool process. I kinda wish I had a stationary camera take time-lapse shots to show the whole process flip-book style. Next time I guess.


It was a long day and I have been allowing my knees a day or two to heal up before I start climbing around under the boat again. It's also (hopefully) going to cool off a bit by this weekend. That will be a nice change to the scorcher we had this week. Thanks again to Guy, Tracey, Tim, Mary, Tom, Nina, Scott and Marie. Without you guys, I would still just have a stack of lumber.

Y'all are the best.

Tuesday, June 8, 2010

Great Houston Boat Tour, pt. 2

Next stop in the boat tour was Laurent’s house. His white proa is an impressive sight. Laurent is a very precise boatbuilder and his hulls look like they came from and aerospace manufacturer. Very nice stuff. He is also a tenacious sailor. For those who were at the 2009 Texas 200, Laurent is the guy who lost his rig halfway through the first day. His mast came out of the step in some chop in the Lower Laguna Madre and he had to let the boat drift to the shore, where miraculously, he re-raised the mast on the beach by himself. This is a 30 foot A Cat rig. I’m still not quite sure how he did it, but he assures me there was lots of yelling and cursing involved. Here is his boat in its current trailering configuration.


But it wasn’t always so. Previously, the boat has several feet more beam, making it too wide to legally trailer. And if it were turned on its side, it would be too tall as well. So Laurent came up with an interesting solution; split the difference!


Yep, that’s the proa turned to 45 degrees for trailering. I've always had visions of Laurent on the side of the highway trying to explain to the Texas State Trooper, in his thick French accent, how this technically complies with state law. (We had a special bail fund set up for him.) But alas, he had reduced the beam and now can trailer it just like a “normal” multihull.


Here is one of the nifty reversible rudders. I won’t try to explain the complexities of rudders on proas here, but I will say this solution, I believe invented by Kevin O’Neill, is pretty damned ingenious.

Even as I write this, Laurent and Kevin have sailed their proas over to Army Hole on Matagorda Island for a couple days of sailing and camping. I got this picture from Kevin last night.


And here is a short video of Laurent and his daughter ghosting along in light winds in Espiritu Santo Bay.

Next up was a trip over to Yves house to see his SportBoat 18. More on that soon.

Also, Goodfoot went 3D this Sunday. I have tons of pictures and am in the process of writing up a post on how the day proceeded. Stay tuned for more. If enough people click the “Follow” button, I will probably feel more pressure to get these posts up quickly. And comments are always welcome.