Monday, August 8, 2011

Fairing

Fairing sucks.

It’s nasty, dusty work and it takes quite a bit longer than you think it should. And trying to fair on hundred degree days makes it much, much worse. However... it is a cool thing to see the hull go from rough plywood to a smooth surface ready for paint. And as much as I’m disinclined to hard labor, I do find that working the fairing board over the hull induces a bit of a zen-like state (but with sweat and profanity).

At first, I was planning to just fair the fiberglass seams enough to get them to blend into the sides and bottom a bit and call it good. But the more I thought about it I knew that every time I saw all those inevitable bumps and valleys, and every time another boat was just that tiny bit faster than Goodfoot, I would curse myself for not spending the extra time to get it right. Or at least as right as I’m able.

So, while claiming no expertise in the matter of fairing, here’s what I did:

First, I went after the fiberglass tape seams. The tape that I use has a fairly pronounced stitched edge that stands up quite a bit higher that the surrounding hull. (Once I figured out that these were going to be problem areas for fairing, I took to cutting this ridge away with a utility knife as soon as the epoxy set up enough to resist any movement but before it cured so much that the knife wouldn’t get through it.) To feather these seams I used the random orbital sander with 60 grit and stuck to just smoothing out the outside quarter inch or so of the tape. (This was done before applying the fiberglass cloth over the entire bottom (see previous post).

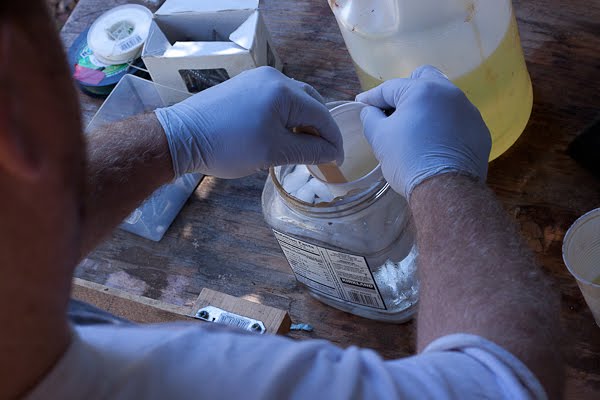
Then I gave the entire hull one coat of filler made of epoxy and phenolic microballoons.


Handy epoxy ratio scale make measuring out the correct ratio of epoxy to hardener easy.

Mixing epoxy on hot days requires an ice bath to keep things from kicking off too quickly.


Fairing mixture

Since the bottom is covered with fiberglass cloth, the goal of this layer was to fill any texture of the cloth weave and add just a tiny bit more thickness to allow for sanding.

Then I built some fairing boards in various lengths and flexibilities. The first boards I made were actually for fairing the centerboard. These were made of 1/8” birch plywood. They were fairly flexible and were quite good for working the curved sections at the bow. But for the flatter sections further aft, I wanted something heavier and stiffer. While pondering what to fabricate this board from, I was spending a few days helping my father-in-law install laminate flooring. I got to looking at the flooring planks, and it dawned on me that this was perfect fairing-board material. I fabricated handles to attached to a piece of the stuff cut large enough to fit a belt-sander belt (50 grit), and then glued a second layer of the flooring to the first. This produced a thick, straight, and barely flexible board that was perfect for the flat, aft sections of the hull.


Laminate flooring fairing board.


These shots show the first layer of fairing compound before and after the first sanding with the rough fairing board.


I used these boards to just knock off high spots in the fairing and then looked for any obvious low spots which I then filled. After this cured I went at it again with the rough fairing board a bit more aggressively, then vacuumed and wiped the hull down with damp rag. This got me to a mostly even hull with a few problem areas that were easily identifiable as small shiny spots. I kept repeating this process filling low spots, scratches, and any hollows at tape seams. After each sanding and cleaning, there were fewer shiny bits showing up. So I kept repeating this until I couldn’t find any problem spots.


Obvious low spots after the first, rough sanding. It took several bouts of filling and sanding to finally fair the areas adjacent to the fiberglass tape seams.


Sometimes it helped to circle the problem spots with a Sharpie so they would be easier to identify quickly when applying the filler.


Fewer problem spots after a two rounds of filling and sanding.


The end is in sight!


I then sanded the entire hull with random orbital starting with 80 grit and progressing to 200 grit. I could try to go smoother than 200, but since I’m planning to roll-and-tip an oil-based porch paint, I figure any more sanding would be overkill. Originally I thought I would spray on a polyurethane paint, but I figure the porch paint will make the inevitable repairs and touch-up much easier.

So now I’m pondering my next step. If go straight to painting from here I’ve read of problems with pinholes and “fish-eyes” developing in the curing paint. I assume this is from out-gassing from the fairing material. So I’m considering one layer of epoxy as a “sealer “ coat before rolling on the paint. If I do this I will likely mix in just enough colloidal silica into the epoxy to begin resisting sag and apply it as thinly as possible with a rubber squeegee, pressing it into the faired surface as much as possible. I did something like this when sealing the raw plywood surface inside the seat tanks. Doing it this way left an almost glassy-smooth surface with no epoxy drips to clean up later.

Like I said, I claim no expertise in this process so if anyone out there reading this has any input of what I’ve done so far, or how to porceed from here, I’d love to hear from you.

Next post should be painting. Also coming up is assembly of the aluminum masts.

Cheers


Friday, July 1, 2011

Glassing the bottom

So a spring full of sailing has slowed the progress on the boat. Once we flipped the hull, it mostly sat there few a few weeks while I took full advantage of an unusually windy beginning to the summer. I crew on a J29, J24, and a Vanguard 15, and this May brought multiple regattas including the National J24 championships, which was a great time. But now the full heat has returned and the winds are starting to moderate, so I am, bit by bit, getting back to working on the boat.

A few weeks ago, a few friends came by to help glass the bottom. It went pretty smoothly. The only minor issue was that the epoxy was ready to kick off pretty quickly even though I'm using the "very slow" hardener. Next time I need to work with large amounts of epoxy in this kind of heat, I will first chill the jugs of epoxy for a few hours in an ice bath. That should slow things down enough to make the process a bit less frantic.

Anyway, here are a few pics of the process under way. It looks a bit haphazard at this point cause we were in such a rush to get the epoxy into the weave of the glass before it kicked.


The glass fabric was just wide enough to span the bottom and wrap the chine about 2 inches at the point of widest beam. So at the transom and bow there was plenty of extra fabric. I just cut the excess off and will fair the edge of the glass into the sides.


There was no way the folds of the fabric at the transom corner were going to behave. Instead of trying to cut and fold things neatly together, I just left them alone and ground off the loose fabric once the epoxy cured. The corners already have three layers of glass tape inside and out, so any more is not really necessary.


The biggest challenge was getting the epoxy to fully saturate the cloth without allowing too much excess that would pool up under the glass and allow it to float up off the wood. This took some practice with the right amount of pressure with rubber squeegees to get it just right.


Once we got the technique dialed-in, the result was a well saturated glass that still had some of the weave of the fabric showing on the surface.

Right now I'm starting the process of fairing, which is a long, nasty project. I'll try to get some pics of that up soon.

Sunday, April 3, 2011

Boat Flip

Today is boat-flipping day.

I've lined up about 6-8 strong guys and bought a few cases of beer. This is probably more than enough (people, not beer). The plan is pretty straight forward: (1) lift the boat off the hull-shaped cradle,


(2) disassemble cradle and get it out of the way, (3) get boat into the yard, (4) replace cradle with new supports that support the inwales. Then (5) roll boat the boat over and (6) place on the new supports. Finally (7 and 8) drink beer/eat pizza.

Anything that seems so simple makes me suspicious. I think probably the biggest lesson I've taken from sailing over the years is that it's a good habit to always keep in mind the worst-case scenario. Not in a paranoid, tinfoil-cap-wearing kind of way, but rather cultivating a heightened sense of impending doom. Then, when things start to go south, you have half a chance at being prepared and perhaps even a step or two on the way to recovery. And, when things do go according to plan, it seems much more like an actual victory. Much more pleasant this way.

So in this tradition, I've spent some time mentally walking through the rollover. Here's how that has gone:

1) We lift the boat off the cradle then promptly trip over all the scrap lumber stored under the cradle. I've now relocated all the scraps.

2) Lift the boat off the cradle, trip over the dog. He likes to help whenever there's a big project like this. Can't help it, he's part cattle dog. Apparently, the cat is looking for ways to help as well, mostly by taking a nap in the seat tanks. Here's the evidence.


Tell-tale paw prints

3) Lift boat, start moving it when someone discovers one of those nasty, sharp epoxy drips, cuts their hand and drops the boat. I've now given the hull another once-over with a chisel and some sandpaper, plus bought a few extra pairs of gloves.

I quickly realized I could imagine about a million ways to screw this up. So rather than worry too much about it, better to just get on with it.

For the most part, the hull is pretty strong at this point. The only potential weak spot is at the top of the sides at the widest part of the beam. This is because the decks, which will be fiberglassed at a right angle to the sides, are not installed yet. So the problem is that when rolling the boat, this is the part that will naturally want to rest on the ground, potentially bending it to the point of cracking the inwale. My solution was to add lateral braces that screwed into the inwale as well as braces at the forward bulkhead and near the bow.


The bow is an especially tricky part when flipping, because there aren't any good places to get a grip. So I constructed this little block shaped to fit under the inwale and bolted it to a two-by-six to use as a lifting bar. Like so,


The brace at the forward bulkhead was screwed to the forward beam, but rather than let all the weight fall on these screws, I added cargo straps that went around the hull to help carry the load.

All of these braces were allowed to stick out beyond the edge of the sides so that when rolling, the braces, rather than the sides, would meet the ground. This distributed the weight of the hull nicely to the strong bulkheads and made the flip go very smoothly.

Here's a quick view of the whole process.


A few strong guys, a plan, and Bob's your uncle.

Now with the boat inverted, it's on to taping the outer seams, fiberglassing the bottom, cutting the centerboard slot, installing the keel, and installing an Anderson bailer. Then fairing, sanding, fairing, sanding, fairing, sanding...then painting.

With any luck, this will be the only time Goodfoot will be upside-down.

Thanks to everyone who helped out (Bob, Bob, Maureen, Nathan, Jay, Andrew, Tom, Marie and Penelope and Woody). You guys are the best.

Tuesday, March 22, 2011

Prep for Seat Install

With the seat tops cut to shape and joined into two panels, it's time to epoxy coat the seat tanks that will be enclosed as well as paint the area that will be tough to access under the front seat.

Here are the seat top panels joined together.


Epoxy coating the side tanks...


...and the painted forward section


I decided to go with a cockpit color a bit toned down from plain white, which would probably give a lot of glare. We looked at a couple off-whites and tried out some samples.

The one on the left was the winner.


Here it is in the cockpit.


The seat tops went on today, but we didn't get a chance to take pictures. I'll post those in the next day or two.

Saturday, March 12, 2011

Cockpit hatches and other stuff

On of the places I'm deviating from the plans is on the access to the side seats compartments. Most builders use top-access seat hatches which require additional framing and leave a seam right in the middle of the most used sitting space. Like this:

Rough opening for seat hatch.


Framing and gutters to drain water into cockpit.


Seat with gutter molded around framing.

From a storage standpoind, they are nice because they give quick access to the large side tanks that make an ideal storage place for fenders, PFDs, and long items like fishing rods or umbrellas. So there's a trade-off in not going with these hatches. Instead, I'm using eight inch quarter-turn inspection ports located on the seat sides.

Cutting the openings.

Fine-tuning with a Dremel.

They fit!

These ports will be much more watertight in a knock down. Plus the size of the opening still fits medium-sized objects like fenders. PFDs will not fit, but the front and rear compartments have plenty of room for that kind of stuff. By placing the openings about three feet from the side bulkhead, I can reach almost all of the compartment with an extended arm.


It may turn out that items roll to the ends of the compartments out of reach. If so, I may have to add additional port at the other ends. But for now I'm going with four ports, one for each side tank.

The quarter-turn hatches are from Duckworks. I've heard that they tend to be a bit more reliable (leak-proof) that the screw-in models. Once they are fully tightened you can feel them click. At this point they are pretty well sealed. However, they are also a bit difficult to re-open. They may loosen up over time, but for now it seems like a good idea to have a tool to help lever them open when needed. This hatch wrench is made of a few plywood scraps and a sturdy piece of pine for a handle.


Once I cut the opening for the hatches, I decided to bulk up the frame of the opening a bit with some 3/8" plywood backers. This will stiffen the area substantially and give the screws for the hatch frames more material to bite into.


Since I'm not using the seat-top hatches I added a few extra pieces of framing for the seat tops to rest on. This might be unnecessary, but the added weight is small and it is going right to the place where people are most likely to be sitting as well as stepping on and off the boat.

Once the hatch openings were cut it was time for a nap.


I'm stretched out on the cockpit floor behind where the thwart will be located. There is easily enough room to sleep between the seats. My plan is to have floor boards that can be raised to the same height as the seat tops, making a single platform of the rear half of the cockpit. With these in place, the beam of the boat is enough for someone my height to lay sideways. Two people sleeping on the boat should not be a problem at all.

This is the backer block for the bow eye. It's made from a solid chunk of cedar which is light, rot resistant and has a high compression strength. It will be epoxied and glassed in place soon.


Pretty soon I will be ready to put the seat tops on. But first the side compartments must by sanded smooth and epoxy coated to keep moisture out. The first couple times I tried to coat vertical areas I always had problems with drips. This was true no matter how thinly I tried to apply the epoxy. So now I have a different approach. I mix the epoxy wit just enough silica thickener to create a mixture that will resist running. It doesn't have to be as thich a a fillet mixture because it will be going on in such a thin layer. I go with a mixture about the thickness of Ranch dressing. Instead of applying it with a brush, I use a squeegee. It goes on in a thin and consistent layer that does not run and requires very little if any sanding once it has cured. I can't be sure, but I think it actually spreads a bit further then an un-thickened batch of the same volume.


Centerboard trunk is going in today. Will post more soon.